beautiful bbq

beautiful bbq
One of many briskets from this summer.

Saturday, March 19, 2011

Smoked St. Louis style ribs

I just made up 17 racks of ribs for co-workers, friends and of course, us. I got some good pictures so I decided it was time to show how to make these come out nearly perfect every time. While I don't give out my recipes for rubs and sauce the Internet is full of great recipes to fit any taste. I do use a brown sugar based dry rub and a sweeter ketchup based sauce for ribs. I find the sweet goes very well with pork. I do add a little heat to both the rub and sauce though.
The ribs: I prefer the St. Louis style ribs for a couple of reasons. While spare ribs are less expensive per pound, the St. Louis style are a great tasting meaty rib and it us much easier to get a lot of ribs into my smoker at one time. I use rib racks that will hold 5 full racks each. The most important thing to look for is to get only fresh ribs and not any that include the word "tender" on the package as most of these have been injected with a salt solution up to 12% by weight. You are paying for that liquid instead of all meat and it does leave them a little salty. I also try to inspect the ribs for a lower fat content on the meaty portion.


 Once I am ready to prepare the ribs and have everything I need ready for them, I take them out of the cooler and get them ready for the smoker fairly quickly to keep the meat from room temperature any longer than they have to be. I usually like to do this the night before smoking as it gives the rub longer to get into the meat and it is a bit of work to do early in the morning. The next step is to remove the membrane from the bone side of the ribs. It isn't easy to get off but it produces a better tasting and eating rib. To do this, with a sharp pointed knife, carefully slice through just the membrane and not any deeper than that as seen here.
Using a paper towel, grab the membrane and pull it towards the side of the rack. After a little practice, this becomes much easier.

Once this is finished, it is time for the adding of the dry rub. If doing this the night before and I have several racks to do, I stack them in a large roasting pan with wax paper in between the layers to keep the rub from coming off. It seems to work very well. Store the ribs in the cooler or fridge this way overnight.

The ribs are now ready for the smoker but the smoker needs to be ready for the ribs. I load up the charcoal in my Weber Smokey Mountain Cooker and use a charcoal chimney and the "Minion Method" of adding hot coals to the layer of charcoal. In this smoker, this will bring the temperature up to the needed temp and keep it there all day with little tinkering. I spray the rib racks with a non-stick spray to make it easier to get them back out of the racks. Let the temperature get well above smoking temperature because adding the ribs is going to cool it back down plenty. I also fill the water pan with water before heating the smoker. Once you add the ribs, add in the needed wood chunks for flavor. I use hickory on most of the meats I smoke but will also use oak and some apple for pork. Smoke the ribs at around 225 degrees for 3 hours keeping the smoke rolling in the smoker. Now to make some purists cringe, I then pull them out of the smoker, wrap them completely in heavy foil with 1/4 cup or so of apple juice and either put back in the smoker or a preheated oven and keep them in for 2 hours at 225 degrees on a sheet tray if in the oven. This stops the ribs from burning on the thinner edges and creates a near fall off the bone tenderness that everyone I know enjoys more than chewy ribs with burnt edges. I know if I get into competition BBQ, I will have to change that somewhat but I make ribs for people to eat and that is how they like them. They look like this at this point.

Now it is time for the sauce. I brush each rack with a nice layer of sauce and put them back in the rib racks. They go back in the smoker for an hour with plenty more smoke rolling through the smoker. They are finished after this and look like these.


If you are going to cut into these right away, use a very sharp knife in between the bones to prevent the rib meat from pulling from the bone. Or, do what I do and use an electric knife. It does a great job.  And if you save some for later, brush them again with the sauce and put them in foil to reheat them in the oven at 300 degrees for 30-40 minutes. For saving any extra ribs for another time, wrap the ribs tightly in a couple layers of foil and add to a heavy duty freezer bag for freezing. This works very well and they taste like fresh smoked ribs after thawing and reheating. Enjoy!!!!!

Sunday, October 10, 2010

Low and Slow BBQ Brisket

I have decided to go a little backwards and show one of the harder pieces of meat to smoke here first. Read ahead to see how to truly make one of the toughest cuts of beef into a melt in your mouth wonder. This piece of meat, if done correctly is done over a 10-14 hour time frame, or longer for the bigger cuts. And my favorite BBQ'd meat by far. Spending 12 years of my life in Texas has taught me how wonderful a brisket sandwich with a little BBQ sauce can be. And Rudy's BBQ in Leon Springs Texas still makes the best I have ever tasted. But, I am in Oregon and most places here just don't seem to either know how, or care to take the time to do it right. A brisket sanwich shouldn't take two hands and all your might to pull the it away from your mouth after trying to taking a bite. It should be tender and fall apart instead. Two places here in Portland really do it well. Probably more but I haven't discovered them yet. Podnah's Pit and Hog Wild are great places to give this a try here.
Starting out, you need to buy a whole packer brisket which consists of the flat, the best sandwich meat, and the point which is much fattier and better served in side dishes like smoked beans. The other option is to chop the whole brisket together after getting out as much fat as you can while chopping. Here, I am using a whole premium Angus brisket which costs a little more but is well worth the money. This is what it looks like right out of the packaging.
This is the lean side. The other side has a layer of fat about 1/4" thick which you want to leave on for moisture. Trim off any hard fat found usually between the flat and point on the thicker end of the meat. You can also trim the layer of fat if it is thicker than 1/4". Also, a very important step is to mark the brisket against the grain of the meat so you know which way the grain runs when finished. I usually cut off a small piece on the end to make it square against the grain to show me which way to slice it when finished.
I like to inject the brisket with a mix of beef broth and Au Jus mix that has been heated up and then cooled back down to around 38 degrees before injecting. Inject every couple of inches while brisket is in a roasting pan to catch the juices that flow out. Be careful not to push the injector all the way through the meat.
Next, I like to add a mustard slather usually consisting of yellow mustard, brown sugar and a little hot sauce. Brush this on all over the brisket. This will not add a mustard flavor when it is finished cooking but helps keep the brisket moist and create a beautiful dark bark on the brisket when finished.
I usually let this sit in the fridge while firing up the smoker at this point. The mustard will get tacky and help the rub stick to the meat better. Get the smoker heated up to around 275-300 degrees before putting the brisket in which will then cool it back down to under 250 degrees in my smoker.
I take the meat back out about 1/2 hour before it is going in the get back to room temperature.  It is now time to add the rub. Here, I used a rub I purchased from a great place in Texas but there are so many great brisket rub recipes on the internet that help you make a great one. A mix of cane sugar, salt and course black pepper makes a great brisket.
Time to get this in the smoker. For this brisket, I am using a Weber Smokey Mountain Cooker which is my favorite smoker for long smoking. After adding the brisket and other meats to the Weber, I added some fist size chunks of hickory to the charcoal to create a great smoked flavor. I always start out fat side up when adding to the smoker and then flip it over about 4 hours in to the smoking. I also try to maintain a temperature between 225 & 240 degrees for smoking brisket. I usually have to add another layer of rub if I am using a water pan because some of the steam will steam off some of the rub if it is close to the water pan. No harm as another layer of rub at this point will blend right in when finished. Here is a look after around 6 hours.
Somewhere between 6 and 8 hours, I chose to wrap the brisket in several layers of foil with some of the injection leftovers in the foil. This may not be the traditional Texas way but it makes a great end product and that is what I am looking for. By now, I have some money and time invested so why not try to get the best piece of meat I can when finished. Now it goes in a roasting pan and back in the smoker or the oven set at 230 degrees. I put a couple of meat thermometers in the thicker portion of the brisket and monitor it until it gets up to around 185 degrees internal temperature. It seems to get to just above 170 degrees and gets stuck there for a while but this is normal for brisket. Just be patient. The big mistake I have seen is people thinking that brisket is done at 165 degrees. This muscular piece of meat needs to cook longer to break down and come out tender. From here, it is more feel than temperature. Sure, you can probably just pull it out at 190-195 degrees and be very happy with it but I like to take the thermometer and push it in to another couple of areas to see just how easily it goes in. It should just slide in and out like butter. This one was perfect at 185 degrees.
From the point you take it out of the oven, open the top of the foil to let out some of the steam and then cover it back up to stop it from cooking too much more while resting. You can let it rest like this for 30 to 45 minutes in the roasting pan or place it in an empty ice chest to keep it warm for up to 4 hours before slicing depending on when you plan to serve it. Once you are ready, separate the flat from the point with a knife. It will slide right through between the two sections because of a thin layer of fat that separates the two sections. Then slice the flat portion across the grain with a very sharp knife or an electric knife into 1/4" slices for sanwiches or go through and take out the larger pieces of fat in the point and chop the whole brisket for sandwiches. I prefer to just slice the flat and add some of my home make spicy bbq sauce to a kaiser roll and add a few layers of sliced brisket for a great meal. The point usually gets sliced, wrapped in foil in 1/2 cup portions to add to my smokey bbq beans later. It freezes very well wrapped tightly in foil.
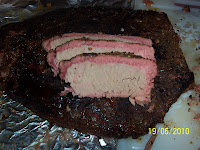
Here is what the slices look like down on the end. Notice the nice pink smoke ring left from the slow smoking.


I hope this helps anyone wanting to give this big tough cut of meat a try in the smoker. It is well worth the time and effort.

Sunday, September 12, 2010

Welcome to my world of real southern BBQ

Here we go on my first ever attempt at blogging. If you have some ideas or suggestions on what I should be doing, please don't hesitate to comment. I feel like a transplanted Texas up here in the beautiful pacific northwest where I was actually raised. I did spend 12 years in the great state of Texas where I fell in love with really slow cooked bbq. Brisket fastly became my favorite but anything cooked that way just melted in my mouth. My smoking experience started with a Big Chief smoker than was thrown away. I quickly grabbed it out of the dumpster, cleaned it up and started smoking salmon and jerky. But it wasn't enough to do everyting else I wanted to try. So my wife bought be a Masterbuilt electric smoker with a thermostat. I began my love affair cooking any kind of bbq I could in that. I graduated to charcoal and wood with a Bandera offset vertical smoker and began learning everything I could about how to make the perfect smoked ribs, brisket and pulled pork. Over the next couple of years, I have worked on rub and sauce recipes to enhance the wonderful smoked meats I was able to make in this unit. I have since added a Weber Smokey Mountain Cooker which will do a dozen racks of ribs at one time. I feel now that I have perfected brisket, pulled pork, ribs and pulled chicken. I still try some new rub recipes, mustard slathers and different sauce recipes to make my bbq the best in the northwest. And every time I smoke something, that is what I hear from everyone who tries it. My quest now is to open a weekend bbq food cart that can really sell the best bbq in Portland. This will show my journey, although slow as it may be, into joining the food cart industry. Thanks for reading my blog and I hope to be able to show my results from testing and keep you informed in my progress.